
Shoot First Fridays: Understanding ACES – A Practical Guide
Shoot First Fridays: Understanding ACES – A Practical Guide
In this edition of our newsletter, we’re tackling a crucial topic that every VFX artist should understand: ACES (Academy Color Encoding System). This is related to the recent topic of LUTs, and it’s…well it’s even less fun than that was, I’m afraid.
If this is too much for you right now, THAT’S FINE! Your time will come.
You could be an excellent VFX artist and filmmaker without ever really touching on ACES, but it’s likely that at some point you’ll need to at least understand it, and you’ll definitely benefit if you work with it. So let’s break down what ACES is, why it matters, and how you can incorporate it into your workflow.
What is ACES?
ACES is a standardized color management system developed by the Academy of Motion Picture Arts and Sciences. It was created to address the challenges of maintaining consistent color across various devices, cameras, and software. If you followed last weeks’ newsletter, you might remember that I mentioned that different brands of cameras record color differently – Arri differently to Sony, differently to Black Magic, etc – and that whilst you’re working you’ll need a technical LUT (“tinted glasses”) to see that data in a naturalistic way.
A problem arises when you’re working with footage filmed on different cameras, and rendered footage, stock footage, AI generated footage, and so on. If they’ve all recorded color in different ways, then you need to keep switching your tinted glasses (applying different LUTs) to view them correctly.
ACES is basically the color space to rule them all. It can hold a huge range of color, and so you can convert to ACES losslessly from whatever color space you were in. So the ACES workflow involves changing everything to work in ACES, regardless of what space it was initially filmed in. Then your technical LUT will convert from ACES to sRGB or rec709, and when you export your project, you’ll convert to one of those color spaces, and you’re done.
Why is ACES Important in VFX?
In the world of VFX, you often deal with footage from multiple cameras, CGI elements, and various color spaces. Without a standardized system, color inconsistencies can creep in, making your work look uneven or unnatural. ACES helps you:
- Maintain Consistency and Reduce Headaches: It standardizes color management across the entire production pipeline, from capture to final output. Learning to use it is a decent sized headache in itself, but when you’re comfortable with it, it strips back the stress of juggling multiple color spaces
- Future-Proof Your Work: ACES supports a wide range of color spaces and dynamic ranges, making your work adaptable to future technologies.
- Ensure Quality: By using a high dynamic range (HDR) working space, ACES allows for more precise color grading and compositing. HDR basically means that you’re working with a greater range of colors than are visible to the human eye. This means that, for example, you can go from very bright and overexposed to very underexposed without losing any detail/information.

How Does ACES Work?
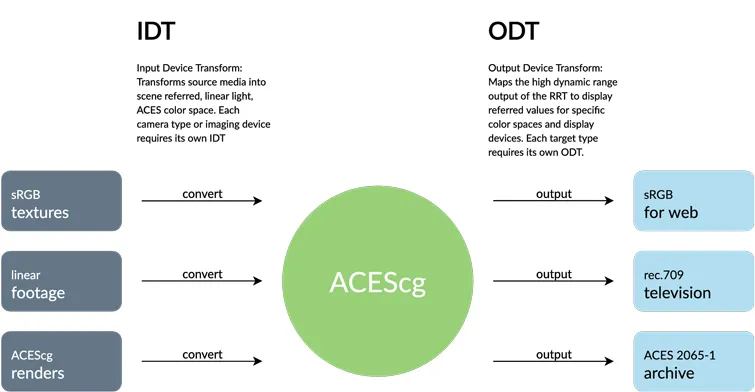
ACES for VFX operates by converting all your footage into a high-fidelity, wide-gamut color space known as ACEScg. Here’s a simplified breakdown of the process:
- Input Transform (IDT): The first step is to convert your footage from its original color space (like Rec.709, sRGB, or LOG) into the ACES color space. This is done using an Input Device Transform (IDT) (This is identical to aLUT, but it’s a permanent change, rather than “tinted glasses” ), which ensures all your assets start from the same color baseline (the ACES color space)
- Work in ACES: Once everything is in the ACES space, you can perform your compositing, VFX, and color grading.
- Output Transform (ODT): After all your work is done, you need to convert your project back into a format that’s suitable for viewing on different devices, like monitors, projectors, or TV, which don’t work in ACES. This is handled by an Output Device Transform (ODT), which translates the ACES color space into the appropriate output color space (like Rec.709 for HD TV).
Want MORE?
Ok it gets a bit more complex. ACES is actually THREE slightly different color spaces. This broke my brain when I was first learning it, so I’ll mention it here just so it’s in your head somewhere!
- ACEScc: A logarithmic color space for color grading, providing intuitive control for colorists (logarithmic color spaces mimic the way that the human eye sees, so grading can feel more natural)
- ACES2065-1: The standardized, linear, archival color space with the widest gamut, used for storing and exchanging data.
- ACEScg: A linear color space for CGI and visual effects, ensuring accurate rendering and compositing. Your renders and compositing will be done in ACEScg
Final Thoughts
ACES may seem complex at first, but it’s a powerful tool that can elevate the quality and consistency of your VFX projects. By mastering ACES, you’ll not only ensure that your work looks its best across all platforms, but you’ll also be better prepared to tackle the demands of professional post-production environments.
And if you never learn it? It’s fine. If your work looks good, don’t worry!